What is a LAVA glaze?
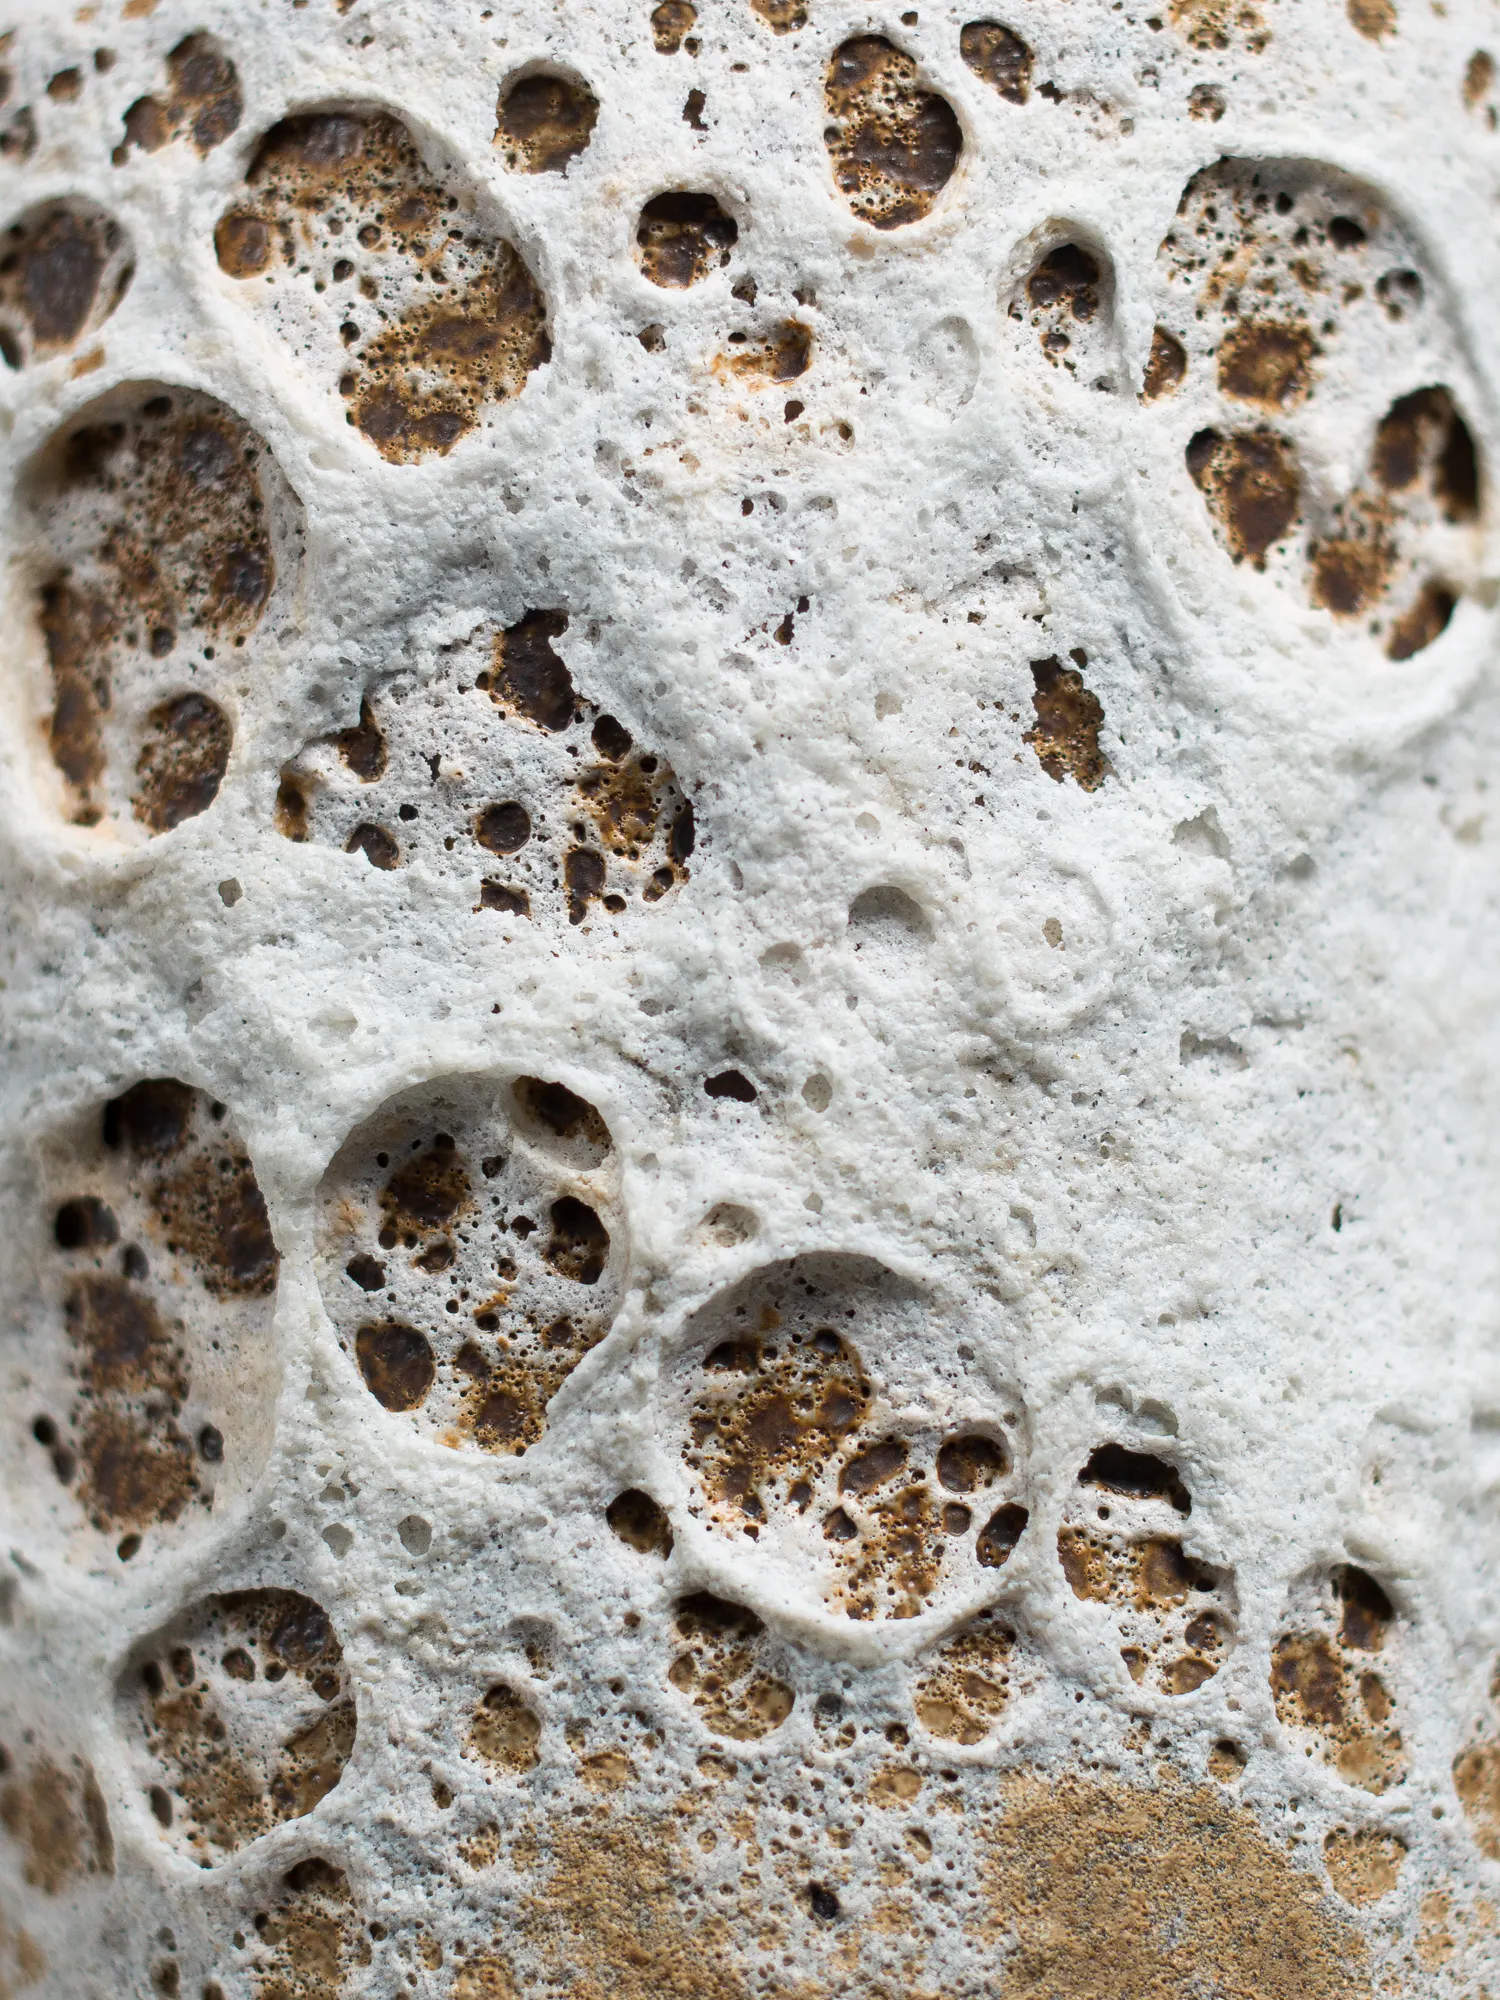
Lava glazes offer a surface quality unlike almost any other ceramic finish: cratered, expanded and full of movement, they bring a distinctly volcanic character to the fired piece. This texture is the result of a carefully balanced glaze chemistry in which gases develop within the molten glaze and are retained long enough to create bubbles, ruptures and cavities across the surface. Rather than settling into an even glassy coat, the glaze forms a tactile landscape of peaks, pits and shadows. In this guide, we explore the chemistry behind lava glazes, the factors that influence their behaviour, and the best ways to apply them for strong, reliable results. Along the way, we also share practical tips and videos featuring two of our signature finishes, White Lava and Lichen.
3 Keys to Successful Lava Glazing
Thickness: Apply 3-4 coats for maximum cratering.
Safety: Use only on exteriors; use a liner glaze for food surfaces.
Firing: Standard stoneware firing with a short soak.
How to apply White Lava
“Lava” describes a glaze that intentionally bubbles, pocks and pinholes during firing to create a rugged, volcanic texture. Rather than aiming for glassy smoothness, lava glazes celebrate controlled disruption: tiny gas pockets expand and burst, leaving a landscape of craters and froth.
At GLOST we design our lava glazes to:
Develop character at sensible brush-on thicknesses,
Hold their texture on vertical surfaces, and
Fire reliably on common stoneware clays.
Quick note on use: lava textures are decorative. For food contact areas, use a suitable liner glaze inside and reserve lava glazes for exteriors and non-food surfaces.
How to Use Lava Glazes: At a Glance
To achieve the best results with lava glazes, follow these three essential steps:
Application: Apply 3 to 4 coats of brush-on lava glaze. Thickness is critical for creating the characteristic craters and volcanic texture.
Firing: Fire to stoneware temperatures (typically Cone 6). A short soak at the top temperature helps the bubbles mature without the glaze running.
Safety: Apply lava glazes only to the exterior or non-food contact surfaces. Use a stable liner glaze for any functional interior surfaces.

Meet the GLOST Lava family
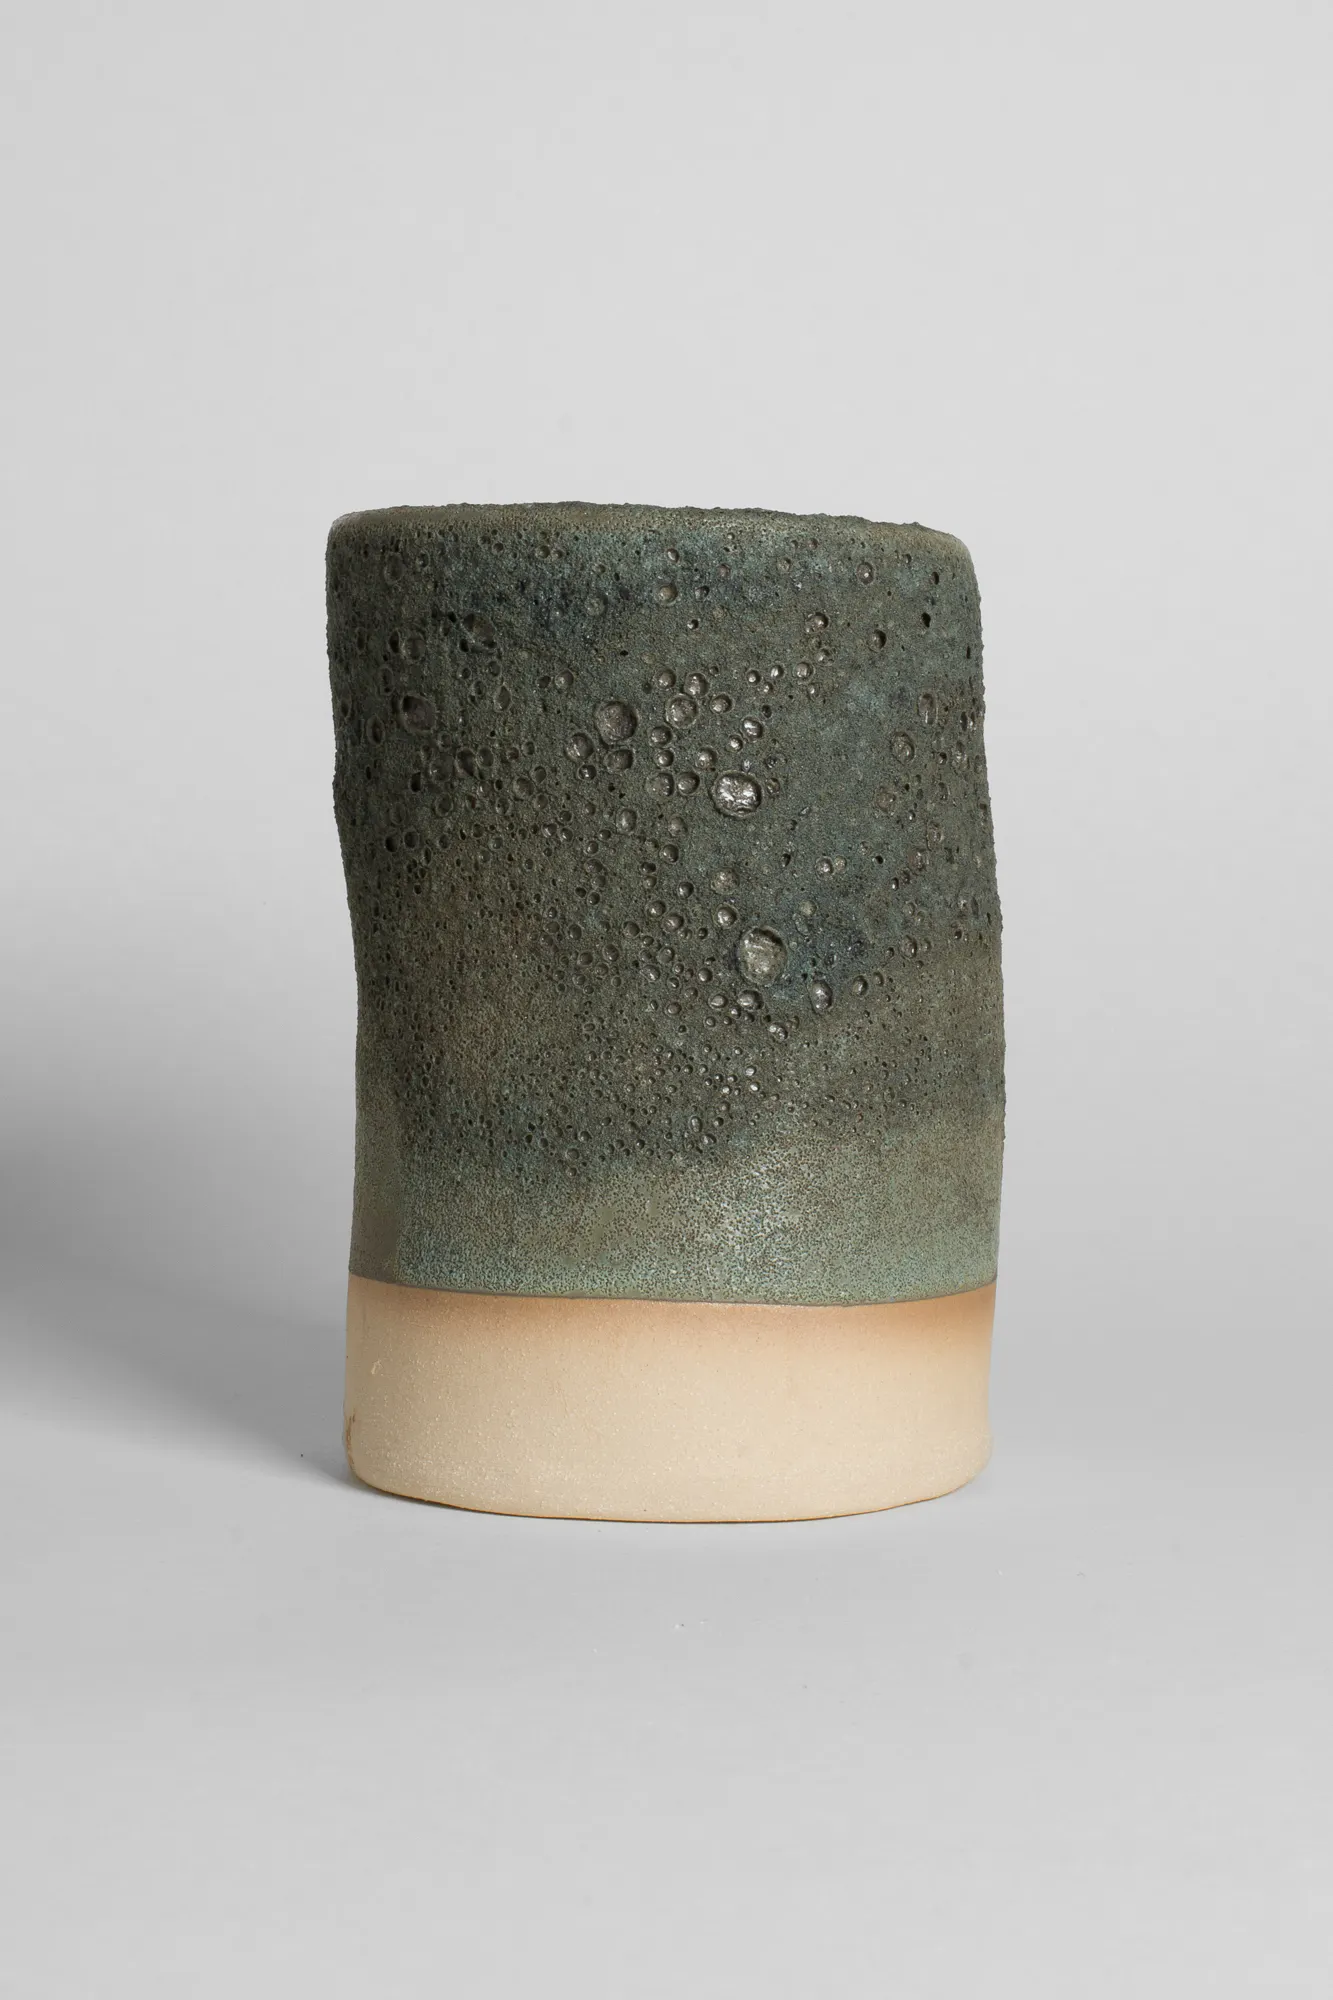
White Lava – chalk-white, high-contrast texture that photographs beautifully and pairs with almost any clay body.
Sea Foam – pale aqua-green with airy craters; gorgeous on sandy, speckled clays.
Pink Lava – soft, candy-shell pink that turns sculptural on rims and handles.
Lichen – mossy green with a natural, organic break across edges, perfect for earthy palettes.
Moss – a deeper, forest-green lava for rich, dramatic surfaces and layered woodland tones.
How lava glazes make their texture
All glazes melt and release small amounts of gas in the kiln. With lava glazes we encourage that gas to create bubbles, then freeze the bubbles in place as the glaze stiffens near maturity. The trick is balancing melt, viscosity and timing so you get character without the whole surface collapsing.
What that means for makers: thickness matters, heatwork matters, and the clay body can shift the final look. (We recommend test tiles—see below.)
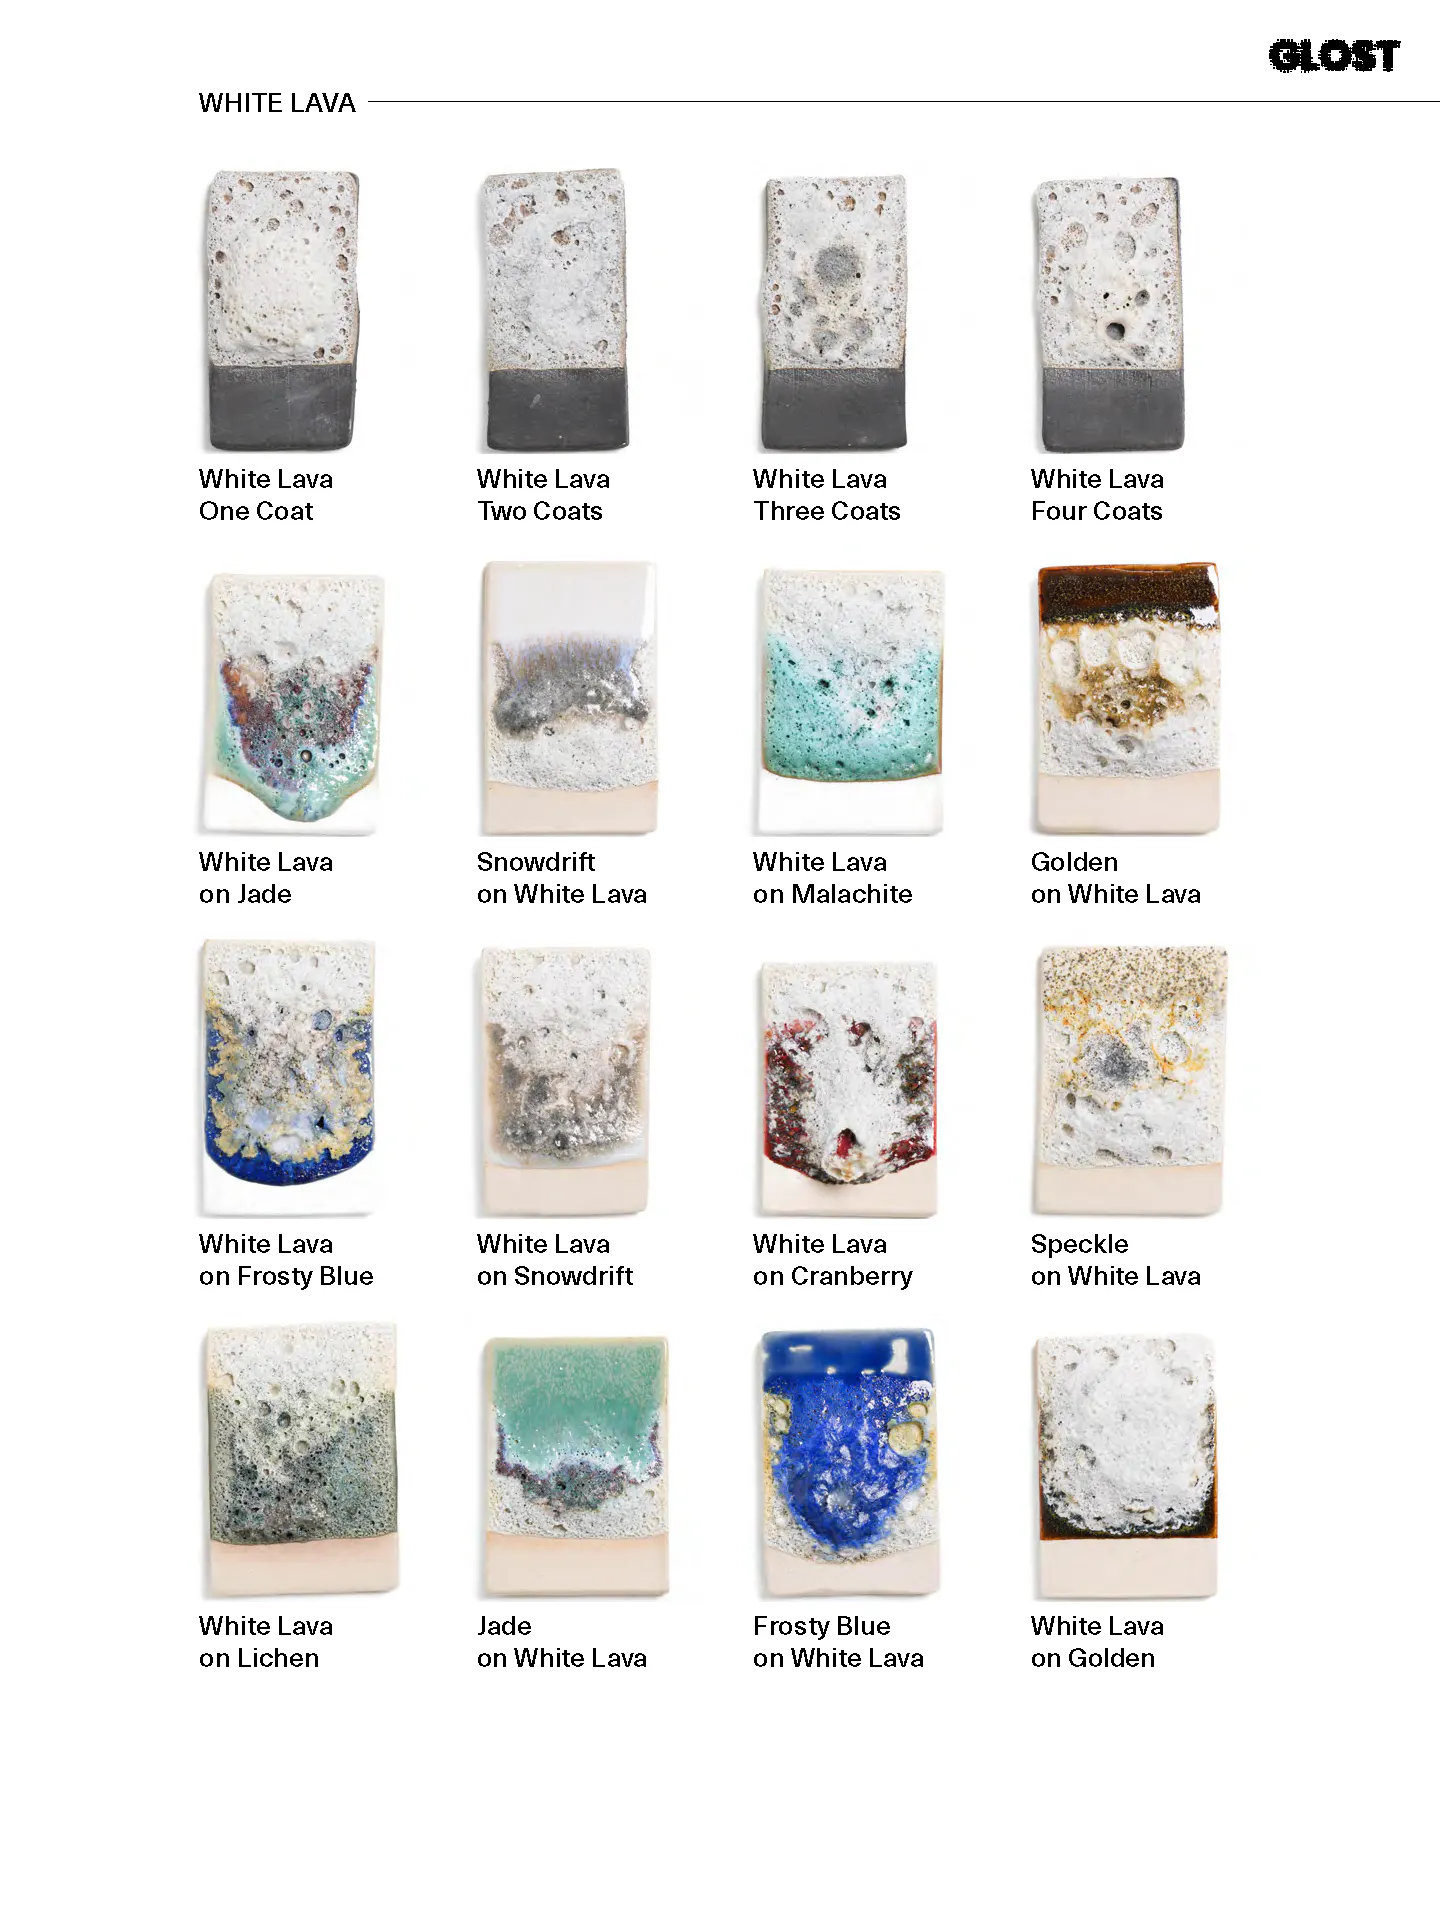
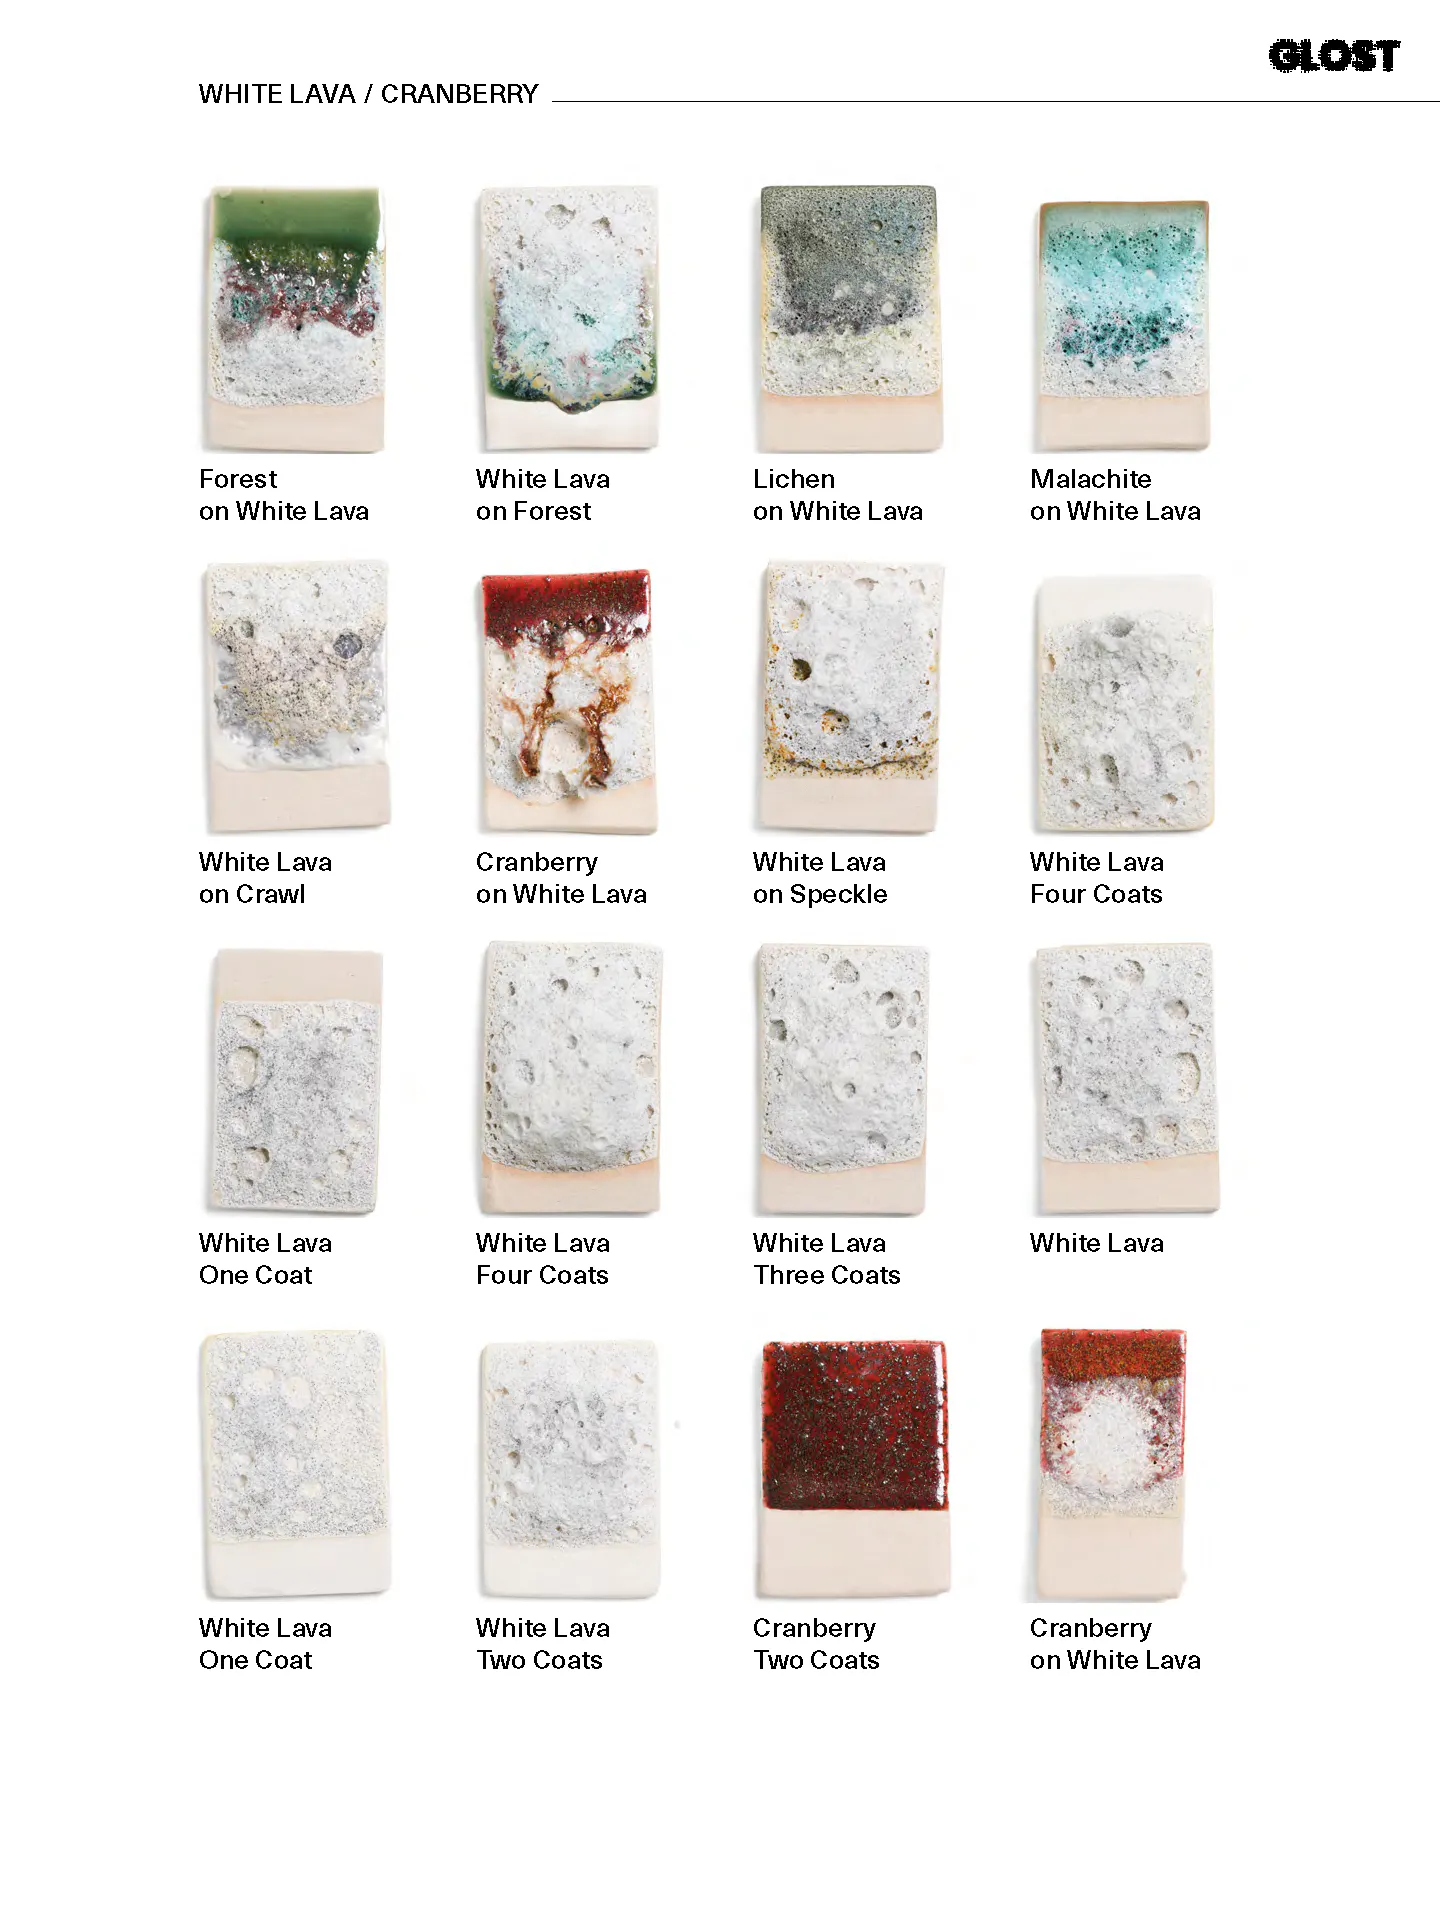
Layering and pairing
Contrast with smooth liners: a satin or glossy interior makes the exterior texture pop.
Edge accents: add an extra pass on lips and handles for bigger craters where the eye lands.
Clay body choice: white stoneware gives clean colour; speckled or iron-bearing clays add natural flecks and warmth.
Colour stories:
White Lava over warm clay for a chalk-on-terracotta feel.
Sea Foam on speckled bodies for beach-rock vibes.
Pink Lava with white interiors for playful pastel contrast.
Lichen and Moss on groggy clays for deep, natural texture.
How to apply LICHEN
Troubleshooting & pro tips
- Too flat? Add one more coat, or extend your final soak slightly (if suitable for your clay/kiln).
- Too cratered or starting to crawl? Reduce thickness, or shorten/soften the soak.
- Pinholes vs. lava texture: micro-pinholes across a glossy glaze can signal issues; in lava glazes, pinholing is the point—it should look intentional and even.
- Test tiles win: make a quick grid—2, 3 and 4 coats; include two clay bodies you use often. Label everything.
Why choose GLOST lava glazes?
- Brush-on, studio-friendly: consistent results without complicated mixing.
- Designed by makers: formulated and tested in a working studio on real forms.
- Community & learning: tutorials, workshops, and an open approach to glaze education.
→ Shop the collection: White Lava · Sea Foam · Pink Lava · Lichen · Moss
FAQs
Are lava glazes food safe?
Use them on the exterior of functional pieces. Keep rims and food contact surfaces covered with a suitable liner glaze.
Do I need a special firing schedule?
Not necessarily. Start with your standard stoneware firing and adjust heatwork (soak length/final temp) if you want more or less texture.
Will they run?
They’re formulated to hold on verticals at sensible thicknesses. Very heavy application can slump—avoid pooling on flat shelves and close to feet. Also watch out when loading closely to other work. when appliead thickly lava glazes can expand and grow sideways.
Which clay bodies work best?
Most stoneware clays perform well. White clays give clean colour; speckled and iron clays add character. Always test on the bodies you use most.