
FIRING CERAMIC GLAZES
Key Success Factors for Kiln Firing:
Key Success Factors for Flawless Firing:
Precision Ramping: The "correct" firing schedule depends entirely on your kiln's density and the thickness of your work. Using a tailored ramp rate—especially during critical quartz inversion stages—prevents thermal shock and ensures structural integrity that standard presets often miss.
Witness Cone Verification: Digital controllers can lie, but physics doesn't. Placing witness cones at various levels is the only way to verify true "heat work" and identify cold spots, ensuring your glazes mature perfectly every time.
Optimized Airflow & Spacing: Heat needs room to move. Proper spacing is essential for even glaze development and oxygen circulation. This is non-negotiable when firing specialized finishes like our Lava Glaze range to avoid "dead spots" in the texture.
Want to master your kiln? Check out our Electric Kiln Firing Fundamentals Course.
Expert Tips for Flawless Ceramic Firing
Getting the best results from your kiln is both an art and a science. Here are some practical, studio-tested tips to help you fire ceramics with confidence and consistency:
1. Preheat Your Kiln
Preheating your kiln helps drive out any residual moisture in your clay or glaze, espcecially if you freshly glazed and the ieces are still wet. For best results, slowly ramp up the temperature in the first stage of the firing —especially for larger or thicker pieces.
2. Use Witness Cones for Accuracy
Even the most reliable kiln can have temperature variations. Place witness cones at different spots inside your kiln to double-check that your target temperature is reached. This ensures your glazes mature properly and your pieces are fully fired.
3. Space Pieces Properly
Good airflow is key! Arrange your pottery with enough space between each piece to allow heat to circulate evenly. Overcrowding can lead to uneven firing, or even fused pieces.This is even more important when using sculptural glazes, such as our Lava ceramic glaze range.
4. Keep a Firing Log
Document each firing session—note the glazes used, firing schedule, temperature reached, and results. This firing log becomes an invaluable reference for troubleshooting and perfecting your process over time.
5. Let the Kiln Cool Down Slowly
Patience pays off! Resist the urge to open the kiln too soon. Rapid cooling can cause cracks or crazing in both clay and glaze. Let your kiln cool before unloading.
6. Test Each Batch for Consistency
Especially when glazing, test on a small sample from each batch. This ensures color and finish consistency, helping you catch any issues before you glaze a whole kiln-load of work.
7. Handle with Care During Loading and Unloading
Be gentle when loading and unloading your pieces. Accidental knocks can chip or break your hard work. Use gloves when work is still hot or freshly fired.
8. Maintain Your Kiln Regularly
Check kiln elements, thermocouples, and shelves for wear or debris. Clean shelves and apply kiln wash as needed to prevent glaze drips from sticking.
9. Track and Review Results
Take photos of finished pieces and keep physical test tiles as references. Over time, you’ll build a visual library that helps with future glaze and firing decisions.


Why firing temperature matters?
The firing temperature in ceramic glaze production stands as a critical and nuanced factor that profoundly influences the outcome of the final piece. This parameter holds the power to transform raw glaze materials into a durable, glassy coating on ceramic surfaces. Different temperatures not only affect the physical and chemical reactions within the glaze but also impact the interaction of oxides and fluxing agents, thereby determining the overall appearance and functionality of the finished ceramic object.
> ENROLL IN THE ELECTRIC KILN FIRING FUNDAMENTALS COURSE HERE <
Earthenware glazes
Earthenware ceramics represent a distinct category within the realm of pottery, characterized by a lower firing temperature and the use of specific clay types. Typically fired at temperatures ranging from 1,800 to 2,100 degrees Fahrenheit (980 to 1,150 degrees Celsius), earthenware is known for its porous nature and a resulting soft, often warm appearance. The lower firing temperature makes it more accessible for artists and potters, allowing them to work with a diverse range of vibrant glazes and achieve a broad spectrum of colors. The type of clay commonly employed for earthenware ceramics is red clay, which contains a higher proportion of iron oxide. This clay type not only contributes to the characteristic reddish-brown hue of fired earthenware but also influences its plasticity, making it well-suited for hand-building techniques and wheel throwing.
Earthenware has a rich historical significance, with ancient examples found in various cultures around the world. Its versatility extends to both functional and decorative applications, from everyday kitchenware to ornamental art pieces. While earthenware is celebrated for its approachability and versatility, its porous nature makes it less suitable for holding liquids without proper glazing. Artists often cherish earthenware for its warm aesthetic, responsiveness to glazes, and the tactile qualities achieved through its distinct firing process.
Stoneware glazes
Stoneware glazes define a category of ceramics known for their durability, versatility, and aesthetic appeal, achieved through firing at relatively higher temperatures. Stoneware is typically fired within the temperature range of 2,200 to 2,400 degrees Fahrenheit (1,200 to 1,315 degrees Celsius). This elevated firing temperature allows for a more complete vitrification process, transforming the clay body into a dense, non-porous, and glass-like material. The vitrification of stoneware not only enhances its strength and resistance to water absorption but also provides a suitable canvas for a wide variety of glazes. The resulting pieces often exhibit a robust and earthy aesthetic, making stoneware a preferred choice for both functional and artistic applications.
Various clay bodies are used in the creation of stoneware, with a common choice being a high-fired clay blend that includes kaolin, ball clay, and feldspar. This combination contributes to the stoneware's strength, plasticity, and workability. The composition of the clay body, coupled with the firing temperature, influences the final appearance and characteristics of the stoneware. Artists appreciate stoneware for its adaptability to a myriad of glaze effects, ranging from matte and satin finishes to glossy and crystalline surfaces. The versatility of stoneware glazes, combined with its durability, has established it as a popular choice for functional pottery, dinnerware, and sculptural forms in the world of ceramics.
All GLOST glazes are created for stoneware temperatures. Check out the current range -> here.

Stages of Firing Ceramics
Most pottery undergoes two firings:
Bisque Firing: This initial firing burns off organic material and prepares the clay for glazing. It hardens the clay while keeping it porous, enabling it to accept glaze. Bisque firing temperatures range from 960°C to 1000°C.
Glaze Firing: This second firing vitrifies the clay and melts the glaze to form a glassy surface. Temperatures vary depending on the type of clay and glaze:
1. Earthenware glazes: 1020°C to 1180°C.
2. Stoneware glazes: 1180°C to 1300°C.
Some potters also practice raw glazing, a single firing process combining bisque and glaze firings. This technique saves time but requires specific clays and glazes and poses a different set of challenges.

Firing Schedules: No One-Size-Fits-All
A kiln firing schedule governs the heating, soaking, and cooling phases. Factors influencing schedules include kiln size, ware thickness, clay and glaze types, and desired results.
Components of a Firing Schedule
Ramp Speed: Controls how quickly the kiln heats up, measured in degrees per hour/ how many hours it might take to reach a chosen temperature. Slower ramps minimize stress on clay.
Set Point: The highest temperature reached.
Soak Time/ Hold : Maintaining a temperature, usually at peak allows glazes to mature evenly.
Cooling: Controlled cooling prevents thermal shock and glaze defects.
What Happens During Firing?
When you fire a glazed piece, it goes through several critical stages:
1. Water Removal (up to 200°C)
First, physical water evaporates from your glaze. This is why proper drying before firing is crucial - trapped water can cause glazes to bubble or pieces to crack.
2. Chemical Water Release (450-600°C)
Clay and glaze materials release chemically bound water. This is a delicate stage where careful temperature control prevents defects.
3. Quartz Inversion (573°C)
A critical phase where silica undergoes a structural change. Slow firing through this temperature helps prevent stress in your pieces.
4. Glaze Melt (900-1300°C depending on the glaze)
This is where the magic happens! Components begin to interact and melt together to form glass. Fluxes activate, colorants develop, and textures form.Water Escape: Free and chemically bound water evaporates.
Heat Work and Pyrometric Cones
Heat work combines temperature and time to achieve ceramic maturity.
HEATWORK = TEMPERATURE x TIME
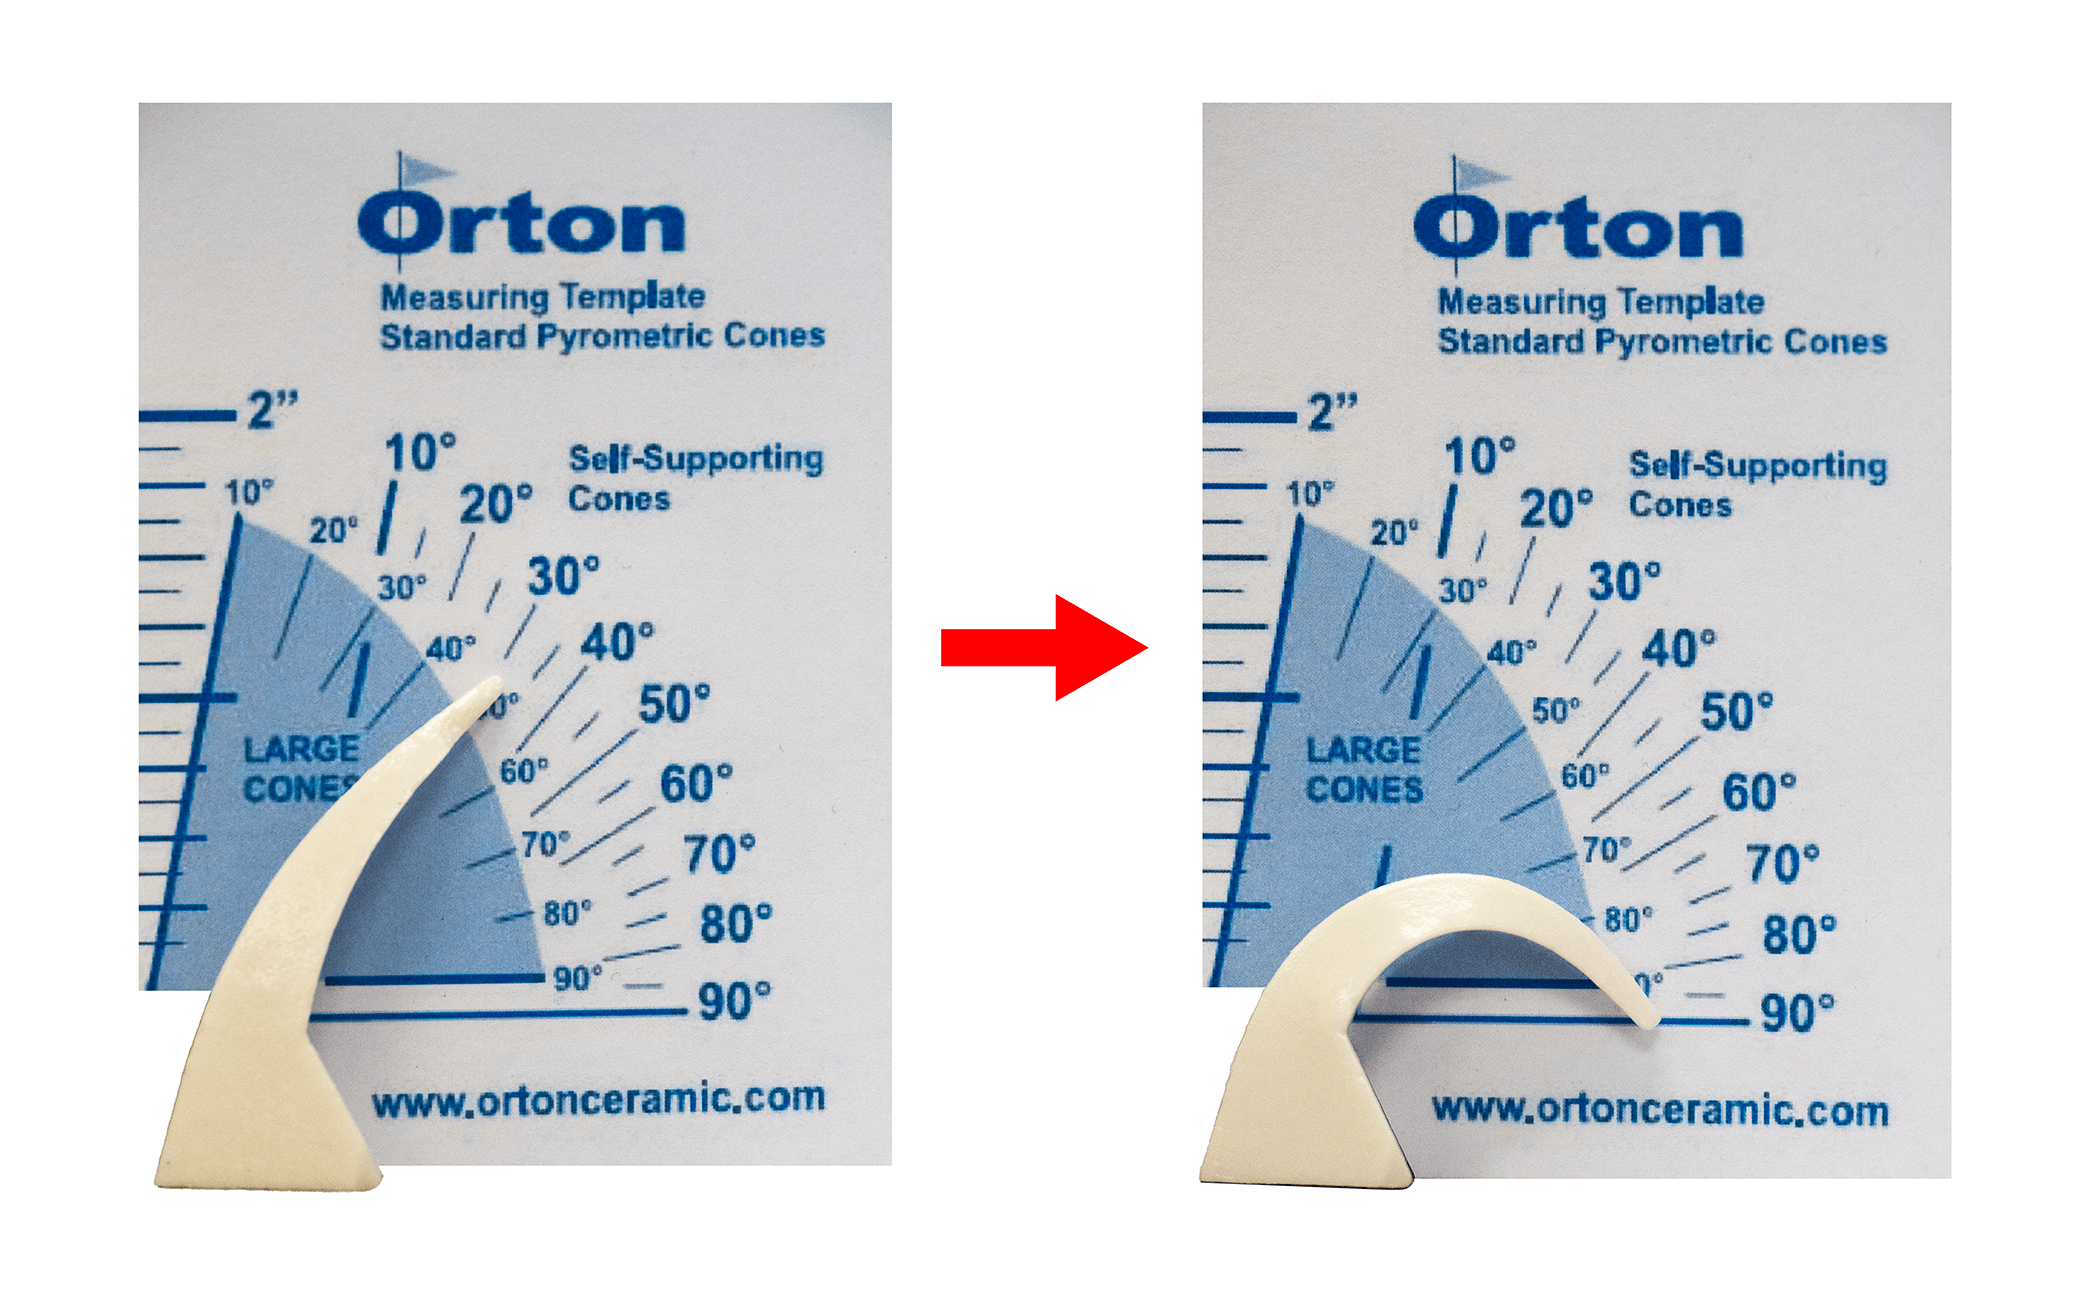
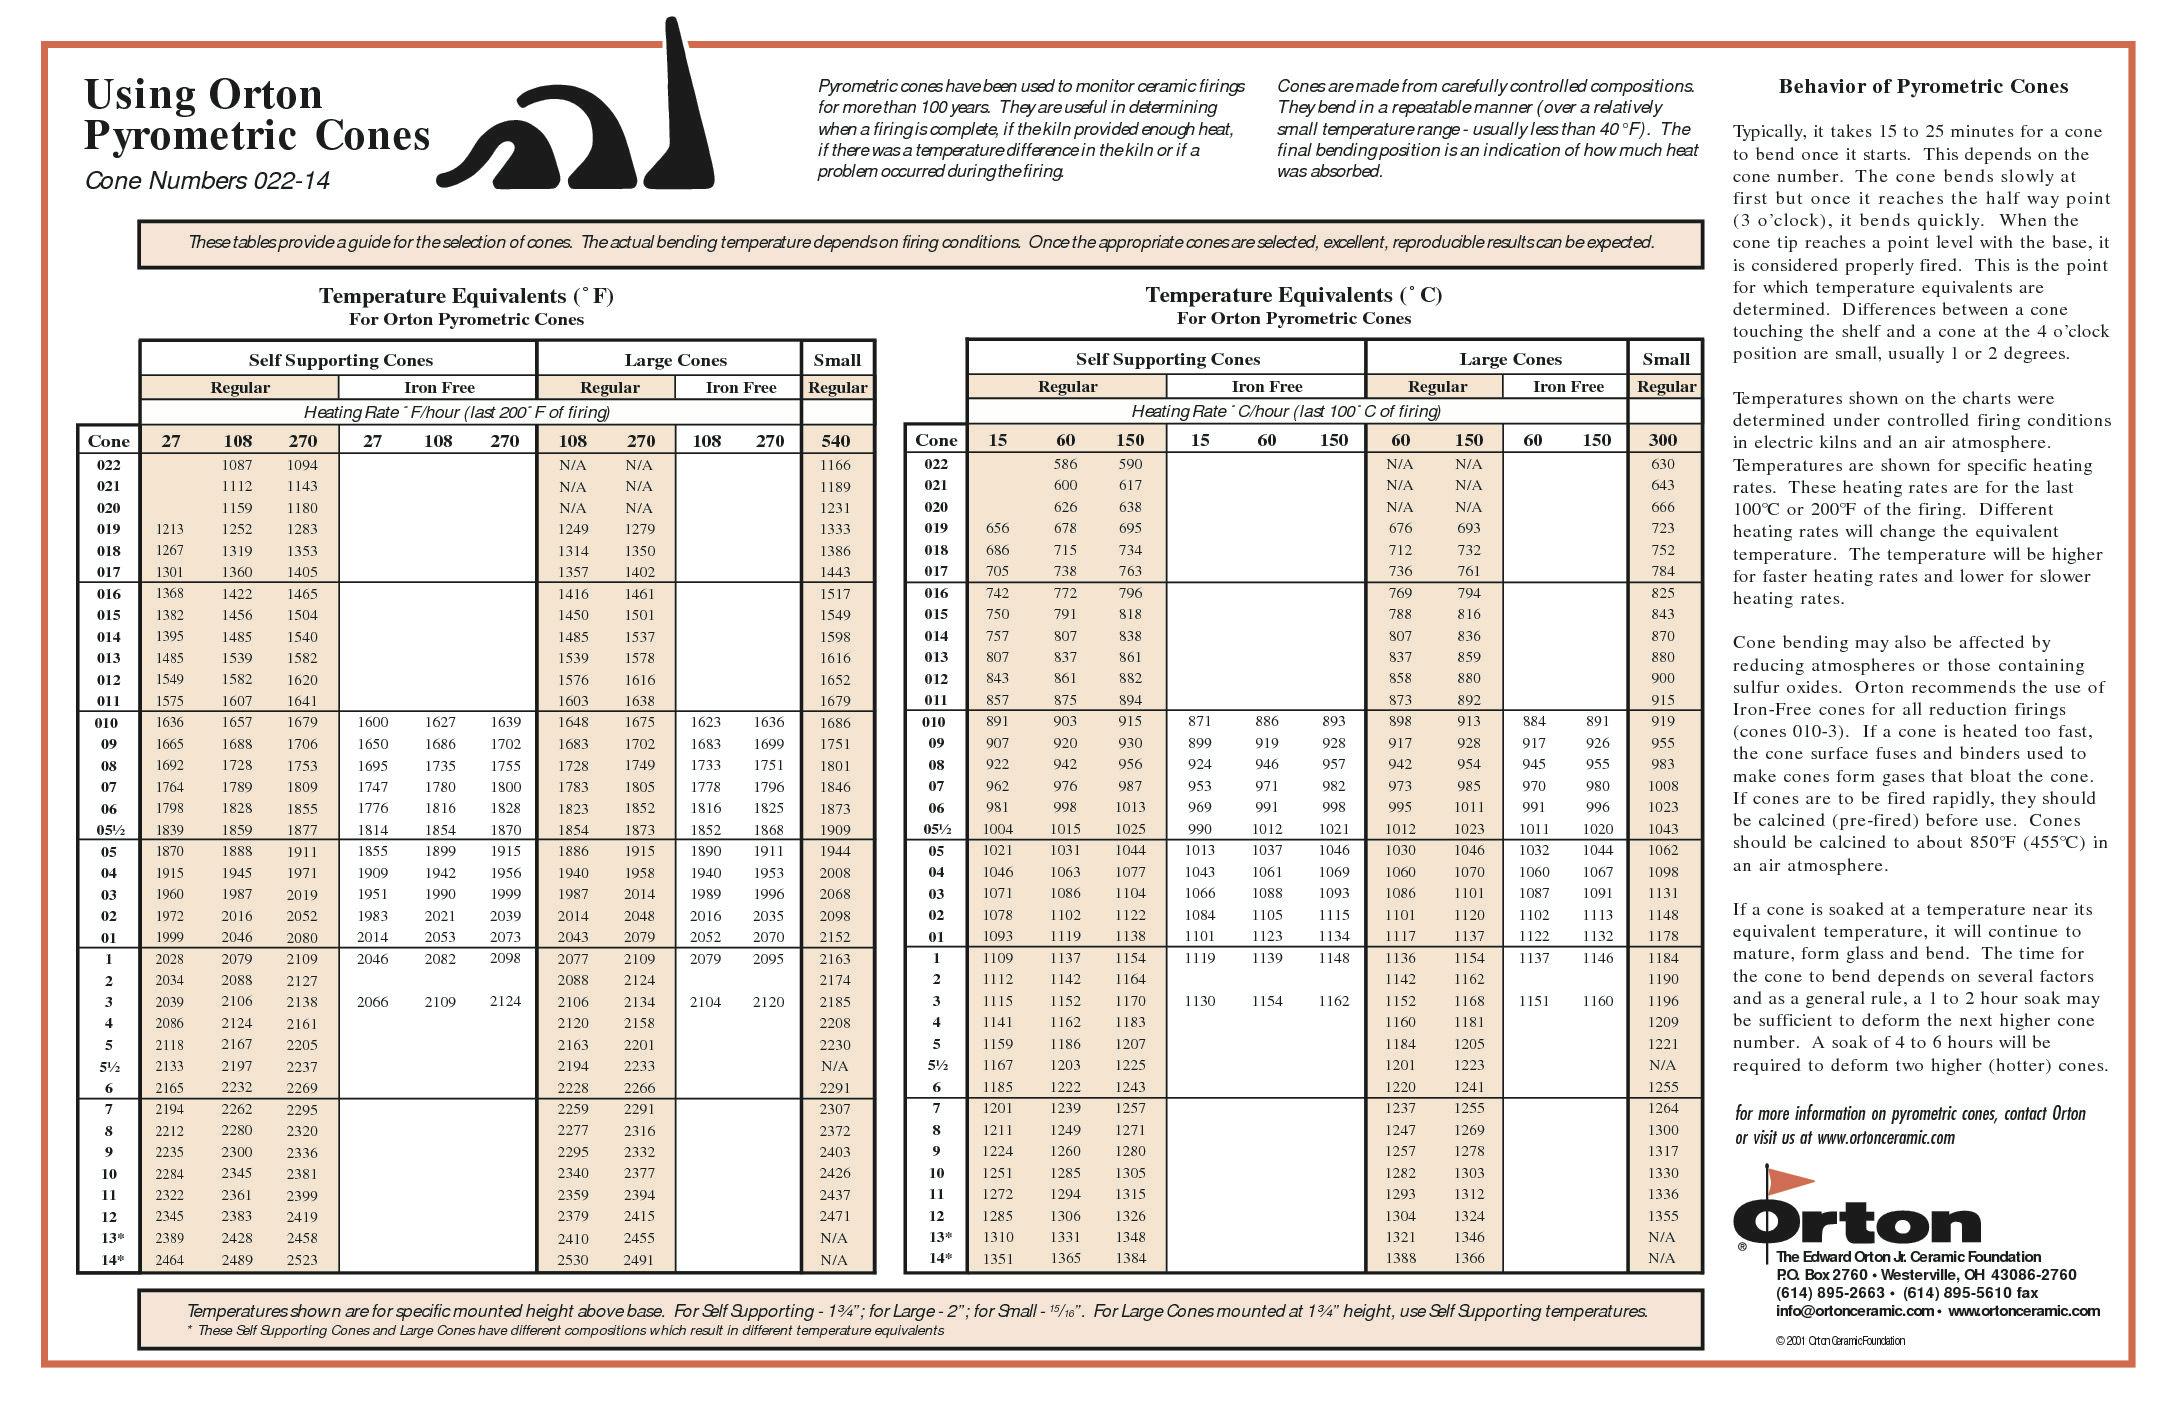
Pyrometric cones, developed by Hermann Seger and later refined by Edward Orton, are pyramid-shaped ceramic devices used to measure heat work in kilns. Cones bend gradually within a specific temperature range, indicating the combined effects of time and temperature.
They are small, pyramid-shaped ceramic devices used in kiln firing to measure heatwork—the combined effect of time and temperature. Made from carefully formulated ceramic materials, each cone is designed to soften and bend at a specific temperature just like glaze itself. When placed inside a kiln, the cone bends when the ware has received the correct amount of heat, providing a visual confirmation that the firing has reached the desired maturity for clays or glazes.
Modern Use of Pyrometric Cones
While historically used actively during firings, pyrometric cones are now primarily used to calibrate electronic kiln controllers. Placed in kilns, they provide a visual confirmation of the heat work achieved, helping potters adjust thermocouples and refine firing programs. Self-supporting cones, which automatically sit at the correct angle, are particularly reliable compared to standard cones.
Many hobbyists rely solely on their kiln controllers without verifying firings with cones. However, cones remain invaluable for identifying inaccuracies in controller readings or firing conditions. For example, a Cone 6 bending at 3:00 is interpreted as 5.8, underscoring their sensitivity in measuring heat work.
In industrial settings, cones are used on ware carts to ensure consistency in tunnel kilns, where temperature stability is critical. Despite advancements in electronic controllers, cones provide a simple yet effective tool for maintaining firing accuracy.


Conclusion
Firing ceramics involves a delicate balance of science, art, and craftsmanship. By understanding the tools, materials, and processes, potters can achieve stunning results while avoiding common pitfalls. With the right kiln, tailored firing schedules, and a commitment to learning, the joy of opening a kiln to discover perfectly fired pieces awaits. Happy firing!